Wednesday, December 28, 2011

Update on Roquefort and Port Salut

The Roqueforts started blooming six(6) days after making it.  This is relatively fast since it is supposed to take between 10 and 12 days.  I've decided I definitely know how to grow penicillium roquforti mold!  This is a pic of two of the three cheeses at about 12 days.  They are also developing a stronger odor.  I am quite happy with how these are starting out.


This is a pic of the Port Salut from last week, after washing with brine.  A week later, this is now much more orange and the b. linens is starting to grow on the sides of the round.  It too is getting a stronger odor.  I still have issues from time to time with blushes of penicillin mold starting on this one.  Even in a closed container, it gets in.  I have washed it with vinegar and salt solution to treat the spots where the penicillin emerge.  This seems to keep it in check.

Monday, December 19, 2011

Penicillin, Penicillin, Everywhere

I am just about ready to age the Roqueforts in the wine refrigerator after sitting out on the counter for 2 days expressing whey.  But it has me concerned.  Even though I have a two compartment wine refrigerator, the penicillium roqueforti used in Stiltons, Roqueforts and other blue veined cheeses seems to cross-contaminate my other cheeses, even though they are in separate containers and in separate compartments of the fridge.  This mold is prolific...and I seem to be able to grow them quite well...maybe too well.

I had my Stiltons in one compartment, isolated from the Port Salut.  Each compartment has it's own cooling fan.  But I still ended up with tiny colonies of p.roqueforti on the Port every now and then.  Once I removed the Stiltons, the tiny colonies on the Port stopped.  Now, I have to put the Roqueforts in the refrigerator.  But maybe the b.linens, which is now blooming well, will prevent the colonies of p.roqueforti from taking hold.

The only other solution is to buy another wine refrigerator, dedicating one to blues and the other to everything else.  THAT will make my wife happy....not.  Another choice is to do blues only for a while, and once wrapped, I can sterilize the refrigerator and prep it for other cheeses.  But I like rotating different cheeses so that I have a variety coming due all the time.  The blues take much longer to age, so that means no cheesemaking of other varieties for over 2 months at a stretch.  Waxed rind cheeses are unaffected by the p. roqueforti, so there is that possibility.  But, still, that takes a lot of planning to time this right.

eBay, I think it's time I check out what wine refrigerators you have available.  Maybe I can get a great deal like the last time.

Friday, December 16, 2011

Planning for The Holidays - Making Something New

I will have plenty of time on my hands between the holidays.  So I figure I'll make 4 different batches of cheeses.  I plan on making ones that have varying ageing times to satisfy my instant gratification, yet have some I can share and eat later.  When done, my little wine refrigerator ought to be full of ripening containers.  I'll have to move my cheddars and the Caciotta to a regular refigerator for a while, but the cheddars need to age for a long time, and the colder temps for a short time will not harm them.  The Caciotta will be ready to eat and share in a week, so it's not long for this world anyway.

First up is a true Roquefort.  I have the sheep's milk already.  I was informed that my frozen sheep's milk was taking up too much room in our small freezer, so they are out defrosting.  The two gallons will make about 3 lbs of cheese, so I'll make three 1 lb rounds.  Two things I have to watch with this one:  handling the curds more gently and sprinkling the penicillin onto the curds evenly as I fill the molds.  Usually, the penicillin is incorporated into the milk, but this time, it's put on the surface of the curds.  The rest is like making Stiltons with some minor changes.  This will take 2-5 months to age (about St Patrick's Day to Easter).  Sigh!

Then I plan on making more juustoa for Christmas at my Mom's house.  Easy peezy, now that I've got the hang of it, especially the removal of the whey while it broils.  But it's instant gratification!

I will be making more Brie.  I have this one down pat!  And it only takes six weeks to age, so by Valentines Day I'll have some tasty cheese to go with a nice wine.

The last cheese I just couldn't decide.  At first I wanted to make an Emmental (Swiss Cheese).  But then I discovered that I'd have to make a huge cheese, otherwise the holes, or "eyes", will burst through the surface.  Suggested minimum:  8 gallons of milk or 9 lbs of cheese!  Plus, I'd have to make it in two pots simultaneously because I don't have an 8 gallon pot (do they even make them that big?).  This is way too ambitious for me.  Besides, I can get good Emmental here in Wisconsin.  Let someone else deal with the size of the batch.  I thought maybe I'd make an Edam or Gouda instead.  Simple and I do enjoy them.  But, again, I can get good Edam and Gouda here.  Why not try something completely new?  So I think I've settled on a Valencay.  It's a goat's milk cheese shaped into small pyramids.  It is both a mold ripened and a vegetable ash ripened cheese.  The ash gets sprinkled on the surface before ageing, and the geotrichnum and penicillin candidum bloom over the ash so it looks frosty.  At least, that's what the picture looks like.  It also has the advantage that it makes 8 small cheeses.  Ideal for sharing. It can be eaten rather young with fruit and crackers, or when older and drier, it can be grated over salads and omelets.  Really versatile!  So now I just have to buy molds and ash.

Stay tuned.  I won't be posting about the juustoa and Brie, since I've made these before and blogged a lot about that already.  But I will post about the Roquefort and Valencay endeavors.

Pink Mold on Stiltons

I had to leave my Stiltons unattended for a full week while I traveled to Quebec City (talk about a place that likes it's fromageries!)  I had left the lid on the container closed because they were so far along in the mold development that I figured they'd be OK.  Well, they weren't.  I came back to patches of pink mold on the surface of the cheese.  The humidity got too high and it encouraged the pink mold.  I immediately scraped off the mold down to cheese that was not discolored, resulting in much smaller and misshaped rounds.  BUT....it tasted great!

I later learned that the pink mold, while garishly unsightly, was not harmful.  Oh, the humanity!...lol.  But now I learned two important lessons.  When in doubt, err on the side of lower humidity, at least if I have to leave them unattended for a long period.  Also, if I ever see pink mold again, I won't fret over whether the darned thing is ruined.

Monday, December 12, 2011

Rosemary Stilton

Here's my rosemary Stilton.  I made a "rosemary tea" with boiling water and a tiny bit of rosemary, strained it, and added the tea to the milk before doing anything else.  It is nearly ready, but because I was traveling and could not monitor this for over a week, the ageing conainer got a little too humid and pink slime started to form on the surface.  Not to worry, a quick trim and it's just fine.  I'm drying them out now outside the ageing container so I can wrap them later.  A little young, but still very tasty.   I'll wrap the rest and put it in cold storage so it gets a little sharper.  Also, next time I use rosemary, I'll try using a little less.  It's not overpowering, but it could be a bit more subtle.

Monday, November 28, 2011

Port Salut - Again!

OK, this time, armed with even more helpful hints, I made another Port Salut this weekend.  We did eat the last one, even though it did not manage to have it's signature orange/red bloom of b. linens.  It tasted great, and from what I described to a cheese master, it was close in taste to the real thing.  The Port Salut you get at a store is not really Port Salut.  It's a "prettied-up" version.  Commercial Port Salut is softer and close to a cross between cream cheese and gooey Brie in texture.  It is rind-less, too.  And the color on the "rind" is imprinted onto the surface using food dyes, so the color is way off...almost neon orange.

Since I've detailed what I've done making Port Salut's before, I'll just cover the highlights of what I did differently this time, to ensure it ripens properly and develops a rind.  I received two tips from different sources that indicated that my previous versions were too acidic, and that's why the b. linens didn't grow.  It's a fast grower, so I should not have had the trouble I did.  To remedy it, I was told by both sources to add a tiny bit (1/64th of a teaspoon) of either GEO 15, Danisco's Choozit brand of geotrichnum candidum (yeast form) bacteria, or a strain of kluyveromyces yeast, Choozit brand KL71.  And I am supposed to use these in the bacterial wash as well with the b.linens.  A 1/64th teaspoon is about the size of the tip of knife full of powder.  The yeast acts to stabilize the pH of the cheese and keeps it from becoming too acidic.

I have both of these on hand, so I used both, to make up the 1/64th tsp.  The cheese came out of it's brine solution yesterday afternoon, and after drying for 12 hours at room temperature, it's now in the ageing container at 52F.  Believe it or not, I can see some very faint mottling of yellow mixed in with the usually creamy white color of the cheese already.  That didn't happen last time until a few days after being in the ageing container.

Another tip I received was that it was possible that by avoiding having the cheese be too moist in the container, I accidentally let it get too dry.  So, I will have to monitor the moisture on the surface more carefully and try to find the right balance.

Finally, the cheese is supposed to weigh 2.75 lbs.  Mine weighs 3.2 lbs, or almost half a pound too much, meaning there may be too much water/whey left.  I did press it for 12 hours under medium pressure.  But I think I'll lose some weight as it ages.  So I'll weigh it again in a week to see what it is.  The salt from the brining is still on the surface.  It should pull more moisture out over time..

Thursday, November 24, 2011

Creme Fraiche

With all the "little bugs", bacteria, mold, and yeast, I've collected trying different cheeses, making Finnish viili (yogurt), and cultured butter, I thought it time to make some creme fraiche....real creme fraiche.  Since it's Thanksgiving, it should be a great compliment to the pumpkin pie I will be making to share at my sister's house.  The tartness of the creme fraiche will counter the sweetness of the pie.  But not just ordinary creme fraiche.  I had the idea to slightly sweeten it and flavor it with a spice that compliments pumpkin pie.  What I got is a tart, thick, eggnogy flavored creme fraiche.  Tastes great.


According to the recipe, I heated a quart of whipping cream to 70F, added 1/4 teaspoon of the aroma mesophilic culture, and let it rehydrate for 5 minutes.  Then gently stirred it into the cream.  I let it sit out on the counter for 48 hours, chilled in the refrigerator, and then spooned it into a container.  When completely chilled, it is firmer, but soft like prepackaged pudding.  If I wish, I could whip it like whipped cream to make it fluffy, but I think I'll leave it the way it is.  I found a variation online to sweeten the creme fraiche.  It said to use 1-2 Tblsp of sugar for each cup.  I thought that a bit too sweet, so I used about a third of that, and added some nutmeg to taste, realizing that the nutmeg will infuse it's flavor while it sits in the cream.

Speaking of sour cream, I compared the creme fraiche recipe to the one for sour cream.  I never realized they were identical, except that for sour cream, you let the cream and starter set out for 24-36 hours, not 48.  Not sure what the big difference is.  So I took a taste of the creme fraiche after 24 hours, when it was in the sour cream phase.  It was slightly thinner than creme fraiche, and not as tart.  Nothing like the sour cream you buy at the store...it's better.

Our kitchen this week is a veritable "bug" factory.  The creme fraiche was sitting on the counter next to the villi I was making.  The Caciotta and Stilton are ripening in the wine refrigerator, and the cheddars are waxed and ripening too.  I ordered a new strain of b. linens and will be making a new Port Salut on Saturday.  I am determined to not let that cheese defeat me!  But then I think I'll take a break from cheese...at least until Christmas vacation :-)

Tuesday, November 22, 2011

Port Salut, The Saga Continues

I thought the lot number of the LR series b. linens (Choozit LR from Danisco) might be bad.  The b.linens growth had stopped completely a couple weeks ago.  I trimmed off the surface and rebrined it, then applied a smear of b. linens.  It's supposed to be a fast growing bacteria, but two weeks later, nothing.  So I cut into it.  It tastes great.  But not quite right.

I wrote Danisco and they referred me to Diairy Connection, their distributor in Wisconsin.  I thought they could tell me if there was a problem with the lot of LR I have.  Instead, they gave me some more advice.  The pH of my cheese is probably off, inhibiting the b. linens.  I should use the KL 71 yeast to neutralize the pH in the milk and in the smear. 

I sent their response to Debra Amrein-Boyes, author of the recipe book I'm using, to get her thoughts on this.  I am determined to conquer this cheese!  Stay tuned.  I'm not going to post again on Port Salut until I have a pic of a nice bloom on the darned thing.

Waxing Cheddars

I waxed my three cheddars this morning.  I bought a low melting cheese wax and placed it in a stainless bowl over a pot of boiling water to melt the wax.  I used a combination of dipping and brushing to get the wax on.  Fortunately, our kitchen ha a marble cutting slab (under the cheeses in the pic), so I put wax paper down and the cool marble solidified the wax quickly.  I used a low melting cheese wax so I could heat it in a double boiler instead of directly on the stove in a pot.

It was not as hard or messy as I thought it would be.  I made the labels to remind me which one is which, and to remind me of when these ought to be ready. They are now residing quietly in the wine refrigerator at 50F for the next six months. 

I had some difficulty with, you guessed it, the port wine cheddar.  Even though the surface was dry, the wax peeled away from an area after the first coating.  I just removed the wax, remelted it, and continued on.  And, this one had three spots where the curds just would not knit completely.  I held them closed and "spot welded" the joints with wax, letting it cool before handling.   It seemed to work well.

I realized as I was working with these, that when I wax my 3.5 lb Caciotta, I will have to brush on the wax only.  It will be too large to handle easily for dipping.  Oh, well. 

Monday, November 21, 2011

Port Salut Disaster...Again!

I had posted that my remake of the Port Salut was progressing.  Well, it turns out, it's not.  The b. linens stopped growing (if indeed it WAS b. linens), and spoilage mold began to appear.  At first, I tried trimming it.  But when the b. linens wasn't taking over, I had no choice but to either toss it, or carefully trim the rind, re-brine it, and start with a fresh packet of b. linens.  I chose the second option.  It's been two weeks since retrimming it, and no b. linens.  It's supposed to be a fast growing bacteria.  This is not fast.  Now, once again, I am getting small spots of other molds starting on the cheese.  The cheese itself was made over 5 weeks ago.  By now, I should be close to having a ripe Port Salut, with another 1-3 weeks before it's supposed to be done.  Not even close!

I think the lot# of my LR series of Choozit b. linens culture from Danisco is bad, somehow.  I am not giving up, though.  I ordered the SR3 series b. linens and will make a new Port Salut soon.  Although the SR3 is not as aromatic as the LR, it should still work.  My other Choozit cultures all work fine.  It's just the b. linens LR series that isn't.

I now consider this Port Salut a dud.  BUT....it is still edible.  I'm bringing it to my sister's house for Thanksgiving.  Why let it go to waste?

More on Cheddar Troubleshooting

After the port and beer cheddars sat overnight, after I had already tried to re-knit the curds using the water bath method, my port cheddar still showed signs of cracking where the curds meet.  The beer flavored cheddar seemed OK.  I emailed the author of "200 Easy Homemade Cheese Recipes" to see if she had more suggestions.

Evidently, I am doing all I can now that this happened.  She said she has run into this as well, until they finally discovered that the wine has a low pH (acidic) and that interferes with the curd's ability to knit when pressed.  Beer can also have this effect, but less so.  Hmmm...seems to match my experience.  She suggested that the next time, I buy a wine conditioner and add it to the port before soaking the curds.  It raises the pH and helps.  The downside is that it sweetens the wine.  Wine conditioners are made with complex sugars.  I think, too, I'll still warm the port to 100F to keep the curds warm while they soak, just to be sure.  Patting the curds with a lint-free towel after they've soaked will also help.

But for now, I just have to baby the port cheddar until I can wax it.  Waxing will hold the curds together.  Right now, I'm repressing the port cheddar while it's wrapped in dry cheesecloth, under very light pressure.  This is expressing any moisture, holding the curds closed, and the cheesecloth is wicking away that moisture so the curds can knit a little more.  After that, it's handle with exreme caution.

Learned Something New - Cracks In My Cheddars

Before I get into what I learned by making cheddars, regarding cracking, I have a pic of my Caciotta a day after it has come out of it's brine bath.  I did not use a flash but kept it low light so you can see the couple of specs of saffron on the surface.  What you cannot see is that the saffron continues to infuse yellow color around the threads of saffron, so there are areas where it's brighter yellow with the orange thread in the center.  Glad I decided to keep the threads in the cheese, and not skim them off before draining.  I can smell the slight aroma of saffron if I get my nose close enough to the cheese.  This should be ready by the Holidays...only 4 weeks to ripen.

Now to the cheddar cracks.  My plain cheddar is just fine.  The cut curds knitted nicely, and the surface is drying properly.  The two flavored cheddars developed cracks, more like "looseness" between the curds where they meet.  I read up on it and found that by immersing in the port and beer for 30 minutes, the curds cooled too much and that's what caused them to not knit properly.  Also, it's really dry in the house and they may be drying too fast. Even though they are well packed, if you move or bend the cheese even slightly while handling, you can see a slight separation occur.

OK, I know what causes it.  How do I fix it?  First off, I've read that I need to keep the curds warm until I pack them in the mold.  That means my port and beer needed to be around 100F while they soaked, not room temperature as my recipe called for.  I already made notes in the margin of the recipe book to remind me in the future to do this.  I need to have the surface sealed before I wax them.  So how can I repair the cheese once this happens?  The trick is to immerse the cheese in 150F water for 60 seconds, then repress it for a couple hours.  I made a solution of 3% salt water and did just that.  I placed the cheese on cheesecloth and used it to dunk the cheese, quickly rewrapped it and put it in the press.  This method to repair the cracks kind of works.  Many of them sealed up, but not right away.  There are a few areas where the curds separate from each other still, but it is better.

Finally, I placed the cheese in an ageing container and left the lid partially off so the cheese dries more slowly.  After drying overnight, a few more areas of separation have sealed up.  The tops are sealed, but the underside resting on the mat were more damp, and there were areas that didn't seal on the underside.  I believe that now that I've flipped the cheese, the undersides will be on top and as they dry slowly, they should knit together.

Many thanks to Glenn K. for pointing me in the right direction to find the solution.

Sunday, November 20, 2011

"Caciotta Sunday"

If yesterday was Cheddar Saturday, then today is Caciotta Sunday!  After the labor intensive cheddars, the Caciotta was a walk in the park.  Right now, it's pressing for 6 hours.  After that, I'll brine it, age it for a week, then wax it.


To the left is a picture of the sheep's milk with the saffron threads on top.  I lightly crushed them to have more bits of saffron dispersed throughout the cheese.  To the right is of the gelled milk just before I cut it into curds.  I thought the saffron threads that got trapped floating on top when it set up looked cool.  You can see the color change as the saffron seeps into the milk.

Although I knew sheep's milk gave higher cheese yield per gallon, I was not prepared for it.  I am so used to the way cow's milk behaves.  The sheep's milk gelled much more quickly and was firmer.  The volume of curds was visibly larger than with cow's milk too.  For example, for the same size of molded cheese, I used 3 gallons of cow's milk for the Port Salut, and only two gallons of sheep's milk for the Caciotta.  I did taste the milk before I started.  It's nearly identical in flavor to cow's milk (to me), but it is richer.

Finally a shot of the Caciotta in the press, without the running guide (cylinder) for the top plate.  The top plate is simply on top of the lid for the tomme mold.

"Cheddar Saturday"

I spent the entire day Saturday devoted to making cheddar.  Quite the experience!  Of things I've never done before while making cheese that I did this time:  used annatto, cheddaring process, flavoring curds before pressing.  I can add to that list waxing a cheese when I wax them on Tuesday.  The recipe made just over 3 lbs of cheddar.  Instead of making one large tomme mold of plain cheddar, I opted to divide the curds into thirds to make one plain, one port flavored, and one beer flavored cheddars, each about 1 lb.  Thankfully, I have three smaller tomme molds.

Not much to say about using annatto except that it is an intense colored natural dye.  But when I put it in the milk at the doseage specified, the milk was only as yellow as butter.  But the dye stayed with the milk protein, and the curds got slightly darker.  After pressing, the cheese is developing it's color better.  The curding and cheddaring process were easier than I thought, but time consuming.  I spent 45 minutes stirring the curds in the whey as I raised the temperature from 88F to 102F slowly over that period as the recipe indicated.  Then there was 45 minutes of cheddaring, where the curd mass was in a water bath to maintin the 102F temperature, flipping the mass every 10 minutes.  Not as messy as I thought it might be.  The pic to the right of the cheddaring process is rotated.  No matter what I do to the pic before uploading, the blog decided that this is the direction it needs to be in.  But you get the idea.


Here's a pic of the curds in port and beer before pressing.  This also went way better than I thought it might.  The only problem with soaking the curds to flavor them is that the curds cool down and don't knit together as well as with the plain cheddar.  When I took them out of the press, a few cracks appeared where the individual curds meet.  I put them back in the molds and press and increased the pressure.  I'll leave them there a few more hours to see if this helps.  Even if it doesn't, the cheeses get waxed in a couple days anyway.  So as long as I handle them carefully, it shouldn't be a problem.  If you're interested, the port was Warre's Tawny Port, and the beer is a Belgian style Trappist beer from Canada (La Fin du Monde - or "the end of the world")  It's one of my favorites, and is a strong beer to pair well with cheddar.  I really like the marbling effect the port had on the cheese.  Very pretty.

When I wax them, I decided I need to identify them some way to keep the different kinds separate.  I think I'll print up small labels and after waxing, place the label on the cheese and wax over it to hold it in place.  Somehow, I don't think a sticky label will work well on wax.

Finally, the four gallons of milk I used resulted in about three gallons of whey.  Cheddar is a lower yield cheese, about 10-11%, compared to 15-18% for many cow's milk cheeses.  So the whey had lots of milk in it for ricotta.  So I made ricotta too.  I got about a cup and a half.  Normally, I only get between 1/4 and 1/2 cup of ricotta from other cheese whey.  But because I used annatto, my ricotta is peach colored.  But who cares, it still tastes the same.

Thursday, November 10, 2011

Sheep's Milk Found

After all this time, I found a farmer who is willing to sell me some sheep's milk.  But I have to travel a distance for it.  Luckily, we'll be going past the area on something else, so on our way back, I can pick it up.  It will be frozen, but that should not harm anything.  The farmer assures me that he recently used the frozen milk to make cheese and it turned out fine.  So, I may be changing my plans on the cheddars and making the Caciotta I've been wanting to make, using the sheep's milk.  I think I'll pick up extra milk and keep it in the freezer for a batch of another type of sheep's milk cheese. 

Maybe It's Time To Cheddar

My follower, Glenn  K., just made a cheddar.  There has been something about making cheddar, besides the time to age it to get a sharp cheese, that has kind of put me off.  But my recent trials with the Port Salut have gotten me past the "What if I screw up?" feeling about trying something more difficult.  The cheddaring process makes this a bit more labor intensive.  I'll have to devote an entire day to this.  Cheddaring means that once the curds are drained, you press them into a mass then return it to the pot, and heat the mass, turning it frequently to further acidify the cheese.  Then you have to cut the mass into fat strips, kind of like steak fries in size, salt them, and then press them under high pressure for 12 hours.  Then of course, there's the waxing of the outside of the finished block.

I really like cheddars that have been laced with port wine.  So, I figure if I'm in for a penny, I'm in for a pound.  I have decided I want to attempt flavored cheddars.  Since the recipe uses 16 quarts of milk and one large tomme mold to make a 3 1/2 lb wheel, I think I can actually make two or three smaller cheddars from this simultaneously, one flavored with port wine, one flavored with my favorite beer, and one plain one, just to add to the difficulty.  But that really does not make it that much more difficult. Flavoring happens after the block has been cut up into strips and just before pressing.  So I just need to set up three bowls for the curds and three molds.  If I do it this way, I'll have three 1lb cheeses.  If I made a separate recipe for each, I'd have three 3lb cheeses...whoa!

I need to order some supplies first, and with my schedule, I may not be able to get to this for a couple weeks.  So I am placing an order for some annatto to color the cheese the familiar orange, and some cheese wax, as well as several smaller tomme molds.  I figure once I wax the cheeses, I can imprint an identifier into the wax for the different versions.   My press can accommodate up to three small molds stacked one on top of the other, and they have special molds that are meant just for this purpose.

As they say, go big or go home! 

Tuesday, November 8, 2011

Viili Smoothies - A Treat & Port and Stilton Update

My cousin in Eau Claire and her mother came up with a great idea of making smoothies with the viili culture I gave them.  I've tried it, and I like it!  No real recipe, but I take a cup of viili, add a banana and some frozen berries we get from Schwan's, though any frozen berries or fruit pruee would do, and then blend them up.  The consistency is good, and I don't use any sugar....usually.  Having lived in the UP of Michigan, I'd love to try this with thimble berries when they are in season.  But I doubt that will happen now that I live further away.  I'll just have to make due with blueberries when they are in season to get that feeling of being in the UP when I drink it.


The Port Salut and the latest Stilton are progressing.  Once again, I'm in a lull as I decide what cheese to try next.  My blog follower, Glenn K., is making cheddar.  If you read this post, Glenn, send me a pic of the cheddar so I can post it.  I am very interested in hearing how it goes. 

The Port is just starting it's b. linens bloom.  The color is darker than I expected, but the older spots become more vivid after the scheduled brine washes.  Still fighting the blue/black mold, but the spots are not numerous and very tiny.  I just carefully trim them out.  This should ease once the b. linens takes hold more completely.   The pic of the Port is recent.  But the Stilton pic is a few days old and it's now completely blue and fuzzy.  Although I have to turn and monitor the Port daily, I can now leave the Stilton alone a full week between turnings. 

Now that I have a healthy colony of b. linens on the Port, I started washing with a brine/beer solution to impart a different flavor.  I also found an old miniature fan that I cleaned up.  I use it to rapidly dry the surface of the Port after the washings so the errant molds don't have a chance to take a better hold on a damp surface. 

Wednesday, November 2, 2011

Pic of Stilton

I like the way this next batch of Stilton looks!  The recipe I used was from the book of cheese recipes I referenced earlier, and not the one that came with my cheesemaking kit, like last time.  The main difference was that the Stiltons sat in the mold without any weight on them, so the curds are a bit looser, allowing more air in between the curds so the mold develops easier.  The only trouble is that the curds on the corners tend to flake off if I'm not careful.

On the Port Salut, things are progressing a bit better than the first time.  I made it to the second bacteria wash without large blooms of spoilage mold.  Only a few flecks, more tiny than pepper flakes, every few days.  I've been able to keep it at bay, and now the b. linens appears to be taking off.  I did use Geo 15 in the second wash, as suggested by the recipe book author.  Hopefully, now that the b. linens is taking off, it will crowd out the unwanted mold.  Keep your fingers crossed.

Friday, October 28, 2011

Next Port Salut Crisis

OK, I seem to be cursed...or blessed, depending on whether you view the recurring issues as a problem or a chance to learn.  I am determined to learn something from this.  The Port Salut redux developed the tiniest black specks four days after the b. linens wash.  There were four specks and they were almost microscopic.  My heart sank:  oh, no, not again with the black mold.  I trimmed them out using a clean knife, cleaning it between cutting each speck out.  Then, I once again turned to Debra Amrein-Boyes, author of the cheese recipe book for help.  She has been so patient and kind.  I explained what was going on.  She gave me more hints and encouraged me not to give up.  Below is my retelling of her comments/hints and my responses.
  • How long did I press the cheese and what did it weigh?  She was trying to determine if I had not pressed enough whey out and if the cheese held too much moisture.  I had actually pressed it for a bit longer than recommended because I had done it overnight.  I had also readjusted the pressure on the press every hour for the first few hours, then every two or three hours after that.  As the cheese expresses whey under pressure, it shrinks a bit in size, so to keep the right pressure on it for the duration, I reset the pressure regularly.  So I think I can rule this out, even though I don't have a scale that will weigh 3 lbs.
  • How long had I kept it in the initial brine bath, and was the solution at least 20% salt?  Again, this step was slightly longer than what the recipe called for, and I had indeed ensured the brine was just over 20% salt.  Additionally, she asked if I used iodized salt.  The iodine inhibits mold growth.  Nope...I used Kosher salt.  The salt bath also prepares the surface by altering the pH and surface chemistry making it more suitable for the b. linens.  By now, I was feeling good about my attention to detail.
  • Did I let the surface dry properly after the brining and the first wash, as well as kept the surface dry in the ageing container?  Yes, I did.  In fact, I kept the lid more ajar on the container to lower the humidity.  When I turned the cheese each day, the bottom appeared more moist/glossy, but not damp.  That's because there is little air circulation between the cheese and the container due to the rack and mat, allowing the humidity to rise locally.  So, when I turned the cheese, I let the surface dry a bit before putting it back in the refrigerator.  All good.   I was on a role!
  • Was my b. linens beyond it's expiration date and no longer active?  No.  It was fresh, and the b. linens in the bulk of the cheese had already started to turn the cheese a pastel golden yellow.  The mold was just fine.
  • The only other issue could be surface pH.  She suggested that I continue to trim any black specks that show up, and wait for the b. linens to take off.  Once that happens, the b. linens will crowd out the other species and overwhelm it.  She also suggested I use a little Geo 15 in the next b. linens wash.  Geo 15 is strain 15 of the geotrichum candidum mold.  It's a yeast-like mold and will grow fast and alter the pH of the surface, making it favorable to b. linens.  Further reading on this mold indicates that it is often used for this express purpose in cheesemaking.
I looked at the Port Salut today.  No black spots, but there were three "suspicious" spots that I cut out, not wanting to take any chances.  Because the first b. linens wash is one week after making the cheese, that gives any spurious mold spores a seven-day head-start on the b. linens.  Debra said I should not get discouraged and just keep an eye on it.  Once the b. linens takes hold, it will be fine.  So, I ordered some Geo 15, and it should be here by tomorrow, in time for the next b. linens wash on Sunday.

Keep your fingers crossed!!

Monday, October 24, 2011

More Stilton

On Saturday and Sunday, I made two more 4" round Stiltons.  This time, I used the recipe from the cheese recipe book I have, instead of the recipe that came with the Brie/Blue kit I purchased when I started all this.  The book recipe makes one large 7" tomme mold sized cheese weighing nearly 4 lbs.  I wanted to make two smaller rounds.  It was easy to scale back since I had the kit recipe, which uses 1 gallon of milk and a cup of cream, while the book uses 15 quarts (nearly 4 gallons) and one quart of cream.

The big difference between the two recipes is in the processing.  Once the curd is pressed into a cake overnight to drain off excess whey, the kit says to chop the curd cake, pack it into the mold and press with a weight overnight, turning the cheese regularly, before removing from the mold and putting it in the ageing container and refrigerator.  The book had me crumble the curd cake before placing in the mold.  This time, no weight to press it down.  But I have to continually turn the molds for 4 days before placing into the ageing container and refrigerator.

The looser packing of the curd crumbles should give me more air space inside the cheese to allow for more blue penicillium to cultivate inside the cheese.  This is what I was after.  I was not happy with the amount of blue inside the cheese on my first batch.  Although the first batch of Stilton was tastey, I wanted more blue veining.  Now I only have to wait four months to see if it worked.

Sunday, October 23, 2011

Verdict of a Wider Audience

There were about ten people at my sister's brunch today, including MJ and me.  I think most everyone sampled the cheeses I brought, a Stilton, a Brie, and the juustoa.  Based on different tastes, some like one over another, but overall, everyone liked them, especially the Stilton. Good to know that I can make cheeses that seem edible to others and not just me!!  Yes, I was seeking affirmation and an ego boost, and I got it.  But on some level, I'm never quite sure if the cheese I made (or anything I do) appeals to only me and my tastes, or if it has a wider appeal.  In the end, if I were to give away homemade cheese as gifts, I'd like to know if they are viewed well, or put in the same category as a stale fruit cake:  "Thanks for the thought, you shouldn't have.  No, really, you shouldn't have!"

I think I can scale up and be ready to share in the future.

Friday, October 21, 2011

System for Draining Whey on Juustoa While Broiling

OK.  I'd say my idea was a partial success and that I have bugs to work out.  I did get the whey to drain off as it broiled, but it was not without some issues.  The bottom of the springform pan fit too snugly to allow the whey to drain quickly.  I even loosened the ring a bit, and it didn't help.  So I slid the juustoa directly onto the air crisping pizza pan, keeping the ring around the curds.  And then, I continued to broil.  That seemed to work well.

Unfortunately, when I flipped it over, the curds had begun to ooze slightly through the holes in the pizza pan at the bottom.  I used the original springform bottom to aid me by placing it on top of the now browned juustoa.  The pizza pan did release easily from the cheese, but I had dozens of tiny "nipples" on the surface since the quarter inch that oozed through, which remained attached to the juustoa, sliding back through the holes as I removed the pan.  It made for an interesting effect once it was broiled, but really not bad.  So, no big deal.

So, what did I learn from my experiment?  It works.  But, I absolutely have to cut a circle out of the pizza pan to fit in the springform pan.  Either that, or drill smaller holes throughout the original bottom of the springform pan.  But that's more labor intensive.  With a holed bottom, I won't have to set up a contraption to suspend the pan.  I can then use the original bottom of the springform pan to aid in flipping the juustoa to broil the second side.  I also learned that I should scrape off the "nipples" before removing the holed bottom.  There really won't be much waste, since it only oozed a quarter of an inch or so through the holes.  Then I'll only have a subtle pattern, not tiny brown raised nipples all over the surface.

Wine Refrigerator

Glenn K.  (previously known as Violet), asked about my wine refrigerator in a comment she posted earlier.  I did post my own comments, but just in case they get lost in the plethora of posts lately, here's more on the refrigerator, in case others want to know.  Using a post to do this allows me to give the pros and cons on the one I have.

I bought a Whynter 21-Bottle Dual Zone on ebay.  It is electronically cooled, no refrigerant.  After some thought, I decided on this one for the following reasons:
  • I have a small dorm sized refrigerator that I tried to regulate using a timer and a temperature probe.  This method is purported to work and there are kits available.  But the temperature was too variable.
  • I settled on a dual zone because ageing and storing cheeses use two different temperatures.  Most of the long term ageing is at 40-45 degrees F.  Initial ageing is at 50-55 degrees F, and sometimes as high as 60F.
  • The Whynter was one of the smallest and least expensive of the dual zone models.  I didn't want to dive in and buy a $500 - $800, or higher priced model, without having some experience with a less expensive model so that I would know what to look for if I decided to upgrade eventually.  This one is in the $350 range.  But on ebay, I got it for $175 because it was cosmetically damaged (the back corner and back panel were slightly dented)
  • The wine racks are completely removable, so I could put the plastic ageing container in easily.
For what I intended, this one works rather well.  The main drawback was that the inside was slightly narrower than the ageing container I purchased with my cheese making kit, by about 1/2 an inch.  So I had to buy new containers that would fit, then trim the plastic racks and mats for the containers.  That was a hassle finding the perfect size.  Now the container is just barely big enough to hold 2 four inch rounds of Brie or Stilton.  I'd prefer to have a little more air circulation around the cheeses in the container, but it works.    It's also too small to have more than two ageing containers in the 50-55F zone at one time.  I use the even smaller 40-45F zone for long term ageing of cheeses once they are wrapped.  So far, that zone is big enough for what I intended.

As far as temperature control, it's perfect.  I can set the temperature for each zone and leave it be.  I'm not constantly fussing with a modification to a regular refrigerator.  As far as humidity control in the container, I had used a GE thermometer/hygrometer with remote sensor.  I put the sensor in the ageing container to monitor the humidity.  I have since given that up because there just isn't any room now in the smaller ageing container I am forced to use.  I just judge the humidity by how much moisture beads on the lid of the container, or whether the surface of the cheese is wet, slimy, or sticky.

So, the only complaint I have is the size.  I believe that someday, I may buy a larger wine refrigerator.  But it will have the features that this one has.

Busy Weekend of Cheesemaking Planned

I'm going to make another juustoa for my sister's brunch on Sunday for her friends, to go along with the Brie and the Stilton.  I also plan to make another Stilton this weekend, and this time, I will let it age for the full time before cutting into it...if I can hold out that long.  I've decided to not use the Stilton recipe that came with my kit from www.thecheesemaker.com.  Instead, I'll use the recipe in the book of cheese recipes I purchased.  Then the following weekend, I'll make another cheese from the book.  But I haven't decided which one yet.

Still looking for a source of sheep's milk to make a Caciotta.  But, let's face it, I've not tried real hard to find a source, so I get what I put into it, I guess.

Concerning making juustoa, I have been frustrated by the fact that when I broil it to get that nice brown skin, I have to fight with removing the whey as it gets expressed in the broiling process.  So a lot of times, I feel like I'm boiling it, instead of broiling it.  I do remove the excess whey during the broiling process, but it's messy.  Putting the curd into a 9" round cake pan is also a problem because the sides are barely high enough to hold the curd.  Finally, flipping it over to broil the other side is also a challenge.  I usually tear it, or some of the curds stick to the pan.

I struck upon an idea to solve this.  I bought a 9" springform pan for making cheesecakes and an air crisping pizza pan.  The springform pan has higher sides, and I can loosen the ring a bit to allow the whey to flow from the pan while it broils.  Also, with a removable bottom, it will make turning it over easier (it's a non-stick pan)  The pizza pan has a lot of small holes that are evenly spaced.  I can put the pizza pan on top of a cookie sheet with sides to keep it elevated and have a place for the whey to collect.  Putting the springform pan on top of that will complete the self-removal of the whey as it is expressed during broiling. I was hoping to find a better way to do this, but this should work.  If all goes well, I may eventually cut the pizza pan to fit directly into the springform pan.  That way , it will hold the curds, but allow the whey to drip through.  But I wanted to see if the whole idea works first before putting the effort into cutting the pizza pan to fit the springform pan.  So, I'm giving it a try this weekend and will report on whether this was a success or an epic fail.  

Port Salut Sticky Situation, Resolved?

After leaving the lid off the ageing container for two turns of the cheese, the surface is no longer sticky.  So I returned to leaving the lid on with just a small gap, to hold the moisture in, but not let it get too humid.  Keeping my fingers crossed.

The Port Salut is beginning to lose it's creamy white color and is turning faintly orange/yellow.  So the b.linens is doing it's thing.  If I can get to one week past the first washing without black/blue mold growing, I will be happy.

Thursday, October 20, 2011

Ready to Share My Cheeses

After making several batches of Brie/Camembert and a batch of Stilton, I am ready to let others try my handiwork.  MJ and I are going to a brunch at my sister's house, and we're bringing a wheel of Brie and the last half of the remaining Stilton to share and get comments.  Both are now at the point in ageing where they should be ripe enough.  We had shared one of the Brie's and half a Stilton at a dinner with friends a few weekends ago.  Unfortunately, the Brie was not quite ready and there was a small area in the middle where it was slightly "pasty".  The Stilton was sharper than the first one I cut into, but it needed more time to get even more sharp.  While we like the cheeses I've made so far, we're partial.  I'll have to report on the comments I get next week.

The Port Salut is still the bane of my existance.  The latest attempt appeared to be doing fine this first week.  But yesterday, the surface was moist and sticky when I went to turn it.  No mold yet, thank heavens.  So I left it sit in the wine refrigerator totally uncovered overnight.  This morning, the top and sides were fine, but the bottom was a bit damp.  So, I turned it and left the cover off again.  Once the surface gets back to what it should be, I'll put the cover back on slightly ajar.  The first bacteria wash is slated for Monday.  I am watching this one like a hawk.  I cannot afford to have it go bad.  If it does, I'll move on to another type of cheese to try, and leave the Port Salut until I'm more experienced.

In the mean time, I will have to make more Brie and Stilton, since I'll be out of that completely this weekend.  I seem to have those down pretty good, so it will help my self esteem to make something I know works well for me.

Saturday, October 15, 2011

The Curse of the Port Salut

I tried yesterday to make a new batch of Port Salut.  Somehow, this cheese seems to be my nemisis.  I got everything together according to the recipe.  Forty five minutes after adding the rennet, the milk had not gelled.  Waited another half an hour and still nothing.  So I ended up tossing three gallons of milk.  I am absolutely positive that I used the proper cultures and the rennet.  So much so, that this morning, after getting another three gallons of milk, I went through all my cultures and packets, labeled Ziplock bags with a Sharpie, organized them, and then took out the mesophillic culture, the b. linens, and the rennet, set them aside, and returned the remaining cultures to the freezer.  Even though I am absolutely certain, I triple checked myself this morning, just to satisfy my anal retentive nature.

I suspect that IF I did, indeed, use the right materials, I may have had residual sterilizing agents on the pot, spoons, etc.  I would not think that the tiniest amount of bleach would do this, but to be sure, I resterilized everything again and rinsed the hell out of them, more than usual. 

The only other thing it could be is the rennet.  I tried adding a bit of it to a little milk and it quickly gelled, so that wasn't it.  I am stumped.

This is no longer a desire to make a different cheese.  It has become a quest.  It will not beat me!

Friday, October 14, 2011

Starting Over

I cannot control the mold.  It keeps returning with a vengeance.  Now, I have black, white, brown, and blue mold colonies, and still not b.linens mold.  It is definitely spoilage bacteria and likely from the surface being too moist during those first days.  I thought about trimming the surface off of the cheese and starting with the first brine solution again, but the cheese is too soft to cut well, and I ended up smearing the mold onto the fresh surface.  Kind of defeats the purpose.  Before tossing it, I decided to sample it on the inside.  Pretty good, even for it still being a bit young.  I can see that this cheese would be a good melting cheese.

So, into the trash, and I'll start over again this weekend.  First, I will sterilize the ageing container very carefully, and wipe down the inside of the wine refrigerator with diluted bleach to be sure that I get rid of mold spores that may be in the refrigerator.  Don't want to reintroduce any bad bacteria.

Friday, October 7, 2011

More on Black Mold

The author of the book I use for cheese recipes, Debra Amrein-Boyes author of "200 Easy Homemade Cheese Recipes", was kind enough to respond to my question about my mold.  Initially, she said it could be errant mold spores in the air that took hold, especially since it appeared my ageing conditions were probably too moist.  However, in a follow up, I explained that my b. linens bloom had not yet shown up, so she believes it's spoilage bacteria forming, again, because the cheese is in a too-humid condition.

She instructed me to wash the entire cheese again in brine, and treat any spots of mold with a vinegar/brine wash, but only apply it to the spots.  Then let it dry a bit before returning to the ageing container.  I also need to allow more air circulation while in the ageing container, so the lid is ajar a little.  I may have to reinoculate the surface with b. linens, but that's OK.  I have plenty of it still in the freezer.  I'll just have to let it rehydrate for 12 hours before use.

Ms. Amrein-Boyes said that the surface of the cheese is fairly alkaline (high pH), and this makes it ideal for mold growth.  That's why vinegar is good at spot treating.  So if anything gets in, it takes hold.  I have to be vigilant on the black mold until the b. linens takes off.  Evidently the molds compete and once one really gets established, it tends to inhibit other molds.  That's why getting the black mold out and establishing the right mold will be important.  All I can say is wish me luck in this struggle.  But at least I learned a good lesson.

Many thanks to Debra Amrein-Boyes for taking the time to answer my email.

Black Mold on Port Salut

I don't know what happened.  I am very careful to sterilize everything when making cheese, and when handling the cheese for bacteria/brin washing, turning, etc.  But four days after the second bacteria/brine wash, I found a few (less than a dozen) very small black and brown mold growths the size of pinheads on the Port Salut.

I took a sterile knife and lifted the small spots out so as not to smear the black mold across the surface, spreading it further.  The surface of the cheese is supposed to be moist but not sticky.  Well, it was moist and verging on sticky.  So after removing the visible mold spots, I dabbed the surface with clean, dry, cheesecloth to remove the excess dampness, resterilized the container and mat, and put it back to age.  But this time, I left the lid slightly ajar.  I think it's possible it was too humid in the container, making it ideal for a few mold spores present in the air while I was working with the cheese to grow.  I hope it is not something I introduced while making it.

I should have taken a pic of the mold to post, but I was so keen on removing it as soon as I saw it.  If it comes back, I'll post a pic.  I did write the author of the recipe book I used to make the cheese to see if she had any further suggestions.  I'd hate for this to be ruined.  It is one wheel nearly 3 lbs in weight.  That's a lot of cheese to toss if I cannot control the errant mold.

Thursday, September 29, 2011

Port Salut Already Getting "Pudgy"

It's only been 4 days since I made the wheel of Port Salut and already it's gotten a little shorter and is beginning to bulge around the side...kind of like me!

I realize now that I was not fully prepared to age this cheese.  It's not controlling the temperature or having space in the wine refrigerator.  It's the ageing container.  I had to improvise an ageing container to accommodate the larger size by using a larger square Corning casserole dish.  Even so, now that it's bulging a bit, it won't be long before it starts to touch the sides of the dish.  So now I have to quickly look for a container to purchase.  But at least I'll have one for the next time I make a 6 inch wheel of cheese. 

When it starts to develop it's orange colored rind, I'll post a pick of it.  But already, the color is beginning to turn slightly golden, so I know the bacteria is working it's magic.

Tuesday, September 27, 2011

Port Salut Ready for Ageing

Here's my "baby" at almost 3lbs, fresh from it's brine bath.  I set it next to a Courtland apple for scale.  It is six inches across and quite firm after 8hrs in brine.  I did let it sit at room temperature to dry for 12hrs before putting it in the wine refrigerator at 50 degF in an ageing container.

The recipe says that as it ages, it will begin to bulge, making the side more rounded.  I will also soften.  That should be fun to watch it trasform.  In a week, I have to wash it with a brine and bacteria solution so the rind begins to turn orange from the mold.

Monday, September 26, 2011

Port Salut Cheese

Sunday was a rainy day here and I  was bored.  So I thumbed through my book of 200 cheese recipes and decided to make a Port Salut.  I followed the recipe, but failed to see that it made one large cheese with three gallons of milk.  Based on the recipe, that's one 2.75 lb wheel of cheese!!  Thank heaven I have a cheese press that has both a 4 and a 6 inch diameter casing.  The cheese stands at six inches in diameter and about three inches thick.  This will be ideal for cutting up into wedges and passing out as gifts.

Besides being the largest cheese in size I've attempted, it also had a more complicated process.  Once the curds were cut and settled, I had to remove 1/3 of the whey and replace it with hot water to bring the temperature to 92F.  After stirring and settling, I had to repeat that step to bring the temperature to 98F. By the time I was done, the large curds had expressed a lot of whey and shrunk down to large-curd cottage cheese in size.  I then put the curds in cheesecloth and pressed it for 12 hours.  As I write this, it is now soaking in a brine bath for 8 hours.  Have not done a brine bath before either. 

All I can say at this point is that this will be one heck of a cheese or a huge disaster.  But in two months, I'll know.  In a week, I'll have to do a brine and wash with brevibacterium linens in it.  This mold is also in the cheese itself and will make it turn golden in color.  The wash will yield an orange-colored  edible rind.  Another difference from the fuzzy penicillum molds I've been using so far.

Thursday, September 22, 2011

Viili Rescued!

Well, I got home from a business trip last night and looked at the viili.  It no longer had a watery phase, and had set up to what looked and tasted like a cross between sour cream and viili.  It was still ropey, but thick and more sour.  The master viili I had was still watery, so I tossed the master and took a very small quantity from the thickened batch, spreading it thinly over the inside of a fresh container.  I added my fresh milk and let it set overnight.

This morning, it had begun to thicken and had not separated.  It also tasted right:  tangy, but not as sour as the batch it was made from.  It had the right consistency and was not as thick the batch it came from.  Although it had been out on the counter only 12 hours, it appeared to have matured to the point where it should go into the refrigerator, so that's where I put it.

Tomorrow, I'll take a small portion of my rescued viili and remake my master by adding three tablespoons of milk to one teaspoon of viili.  Let it set overnight and keep it in the refrigerator to use in making future batches.

I have to conclude that I must have used milk that was old and near souring.  By setting it out for 24 hours, the milk soured and separated before the viili cultures grew enough.  However, letting it set for three days undisturbed in the refrigerator, the watery liquid reincorporated as the cultures multiplied to the point of making a sour cream "like" version. 

I did eat the sour batch of viili.  Since there were no signs of contamination, black, yellow or other molds on the surface, I decided it was probably safe.  After all, if cheeses don't show unusual mold growth, but only normal mold growth, they are OK to eat.

Tuesday, September 20, 2011

Viili Disaster

The first batch of viili was perfect!  So I made another couple of batches from the revitalized "master".  This time around, the viili separated into a more thick ropey yogurt and a watery phase.  Possible causes were:  that the the milk I used was that last bit of organic milk we had in the refrigerator and it was older and nearer souring, I contaminated my master, or it was too warm in the house made the viili too warm in that first 24 hrs. 

I ruled out contamination of the master.  I had given some of my master viili to my aunt and cousin for them to try, and their batch came out perfect.  So I am left with old milk or too warm as the cause.  I don't think either one of these harmed the cultures in any way, just the appearance, so I should be able to drain off the excess water, take a bit of the gelatinous yogurt and remake my master.  Both my revitalized master and the two batches were affected.  My wife tells me that the viili smells "a little like vinegar".  So both the older milk and the temperature may be the culprits as it could have soured during the first 24 hours on the counter.  I was disappointed by this set back.

Since I'm traveling this week, it will have to wait a couple days before I can rescue the viili. I'll report on my success or failure to rescue my viili master.  If it ends up that I trashed it, I'll just have to get a new starter.  But I really think I can salvage this.  Stay tuned.

Saturday, September 17, 2011

First Viili Batch

Nearly forgot I was going to post this as I was so anxious to try my first batch of viili.  After I took a few bites, I remembered and rushed to the computer desk to upload a photo.

MJ says it tastes just like she remembers it.  I agree, though I was only a Yupper for 5 years so my experience is more limited than hers.  But the flavor is sour like yogurt, and a little hint of yeast.  And as you can see, the texture is ropey and gelatinous.  We used non-homogenized whole milk for this batch, so it had a bit of yellowish cream on the surface, along with a slight bloom of penicillum candidum to give it it's velvetty feel

I did put blueberries in it this time.  But I found a hidden jar of thimbleberry jam in the cupboard.  My next serving will have a small dollop of thimbleberry jam in it.  Makes me want to have MJ make some nissu.

Thursday, September 15, 2011

Branching Out into Viili (Finnish Yogurt)

It's been over 30 years since I had viili (some call it filia).  It's a Finnish yogurt made at room temperature overnight.  Since starting on my path to recreate good juustoa, I have been looking for an authentic viili starter, too.  It took me a while to find just what it is about viili that makes it different from other yogurts.  Besides containing a mesophilic (cool/moderate temperature loving) lactic acid bacteria, it should also contain geotrichum candidum, a yeast-like fungus that is used in Brie cheese to give it a velvety texture, and two yeasts:  kluveromyces marxianus and pichia fermentans.  The result is a velvety, ropey texture.  Some people say it looks like white snot.  Not very appetizing, and not very accurate, I think. The best thing about viili?  You just put a little starter in milk and set it out at room temperature for 24 hours.  No yogurt maker, no fuss, no muss.

Once I knew what was in it, the hard part was finding a commercially available starter with the right "bugs" in it.  A lot of purported viili starters either didn't say what cultures it contained, or they contained substitutes.  Finally, I did find one at Anahata Balance - Probiotic Cultures, Herbal Teas & Tonics in Buckley, MI.

So tonite, I make viili.  And by the time it's ready, I should have the last of my everbearing strawberries ripe to mix in with it before eating.  Though, I really want blueberries.  Once it's done, I'll post a pic of the end result and let you know if it tastes the way I remember it. 

Friday, September 9, 2011

The Results Are In!

As promised, I made juustoa with the recipe that the commentor, "Violet", sent me.  It worked just fine, as I expected.  I did not drain the curd as I normally do, but did as Violet suggested, and used my hands to gently scoop the curds into the broiling pan.  Actually, it was kind of fun playing with the curds by hand!  The result was that I had more whey expressed from the juustoa during broiling than I normally have, but that was remedied by more frequent draining during the broiling. 

The final juustoa was more moist/soft because of the extra whey left in the cheese using this process.  That is neither a bad thing or a good thing.  Just different.  Also, the extra sugar vs my recipe made a sweeter cheese.  I ususally cut down on the salt from the recipe I posted, but used the full amount this time.  So it turned out more savory.  The cheese still squeaks when you bite into it.  All in all, Violet's recipe works great and tastes great, too. I had no issues with the curds being grainy or falling apart.  They held their shape beautifully.

What's the verdict?  Well, my wife, MJ, who grew up on juustoa in the UP of Michigan liked it as did I.  I'd make this one again.  It also shows that you can vary the recipe and process to produce a juustoa that is tailored to your individual taste:  more or less sugar, more or less salt, more firm or softer cheese by varying the time and way you drain the whey, etc. 

So, my recommendation is find a recipe and feel free to experiment.  Then settle on a process that makes a personal favorite.  Just stay away from homogenized milk, or the curds end up weak and grainy.  Before the year is out, I will try juustoa made with powdered milk so I can report on that method.  I am skeptical, but willing to give it a shot.  So, Violet, if you get to make juustoa with powdered milk before I do, please tell me how it turned out! 

Thursday, September 8, 2011

Trying A New Juustoa Recipe

Today, I've decided to try the recipe for juustoa that "Violet" sent in with her comments on one of my first blog posts.  I'm planning on starting it around lunchtime.  I will follow the recipe exactly, except for the raw milk part...I'll be using the organic whole milk (non-homogenized) I usually use from Castle Rock Dairy.

After we've had a sample of it, I'll report on my attempt, and the quality of the cheese.  I'm sure it will work just fine, but I am curious to see how it differs from what I'm used to doing.

Monday, September 5, 2011

More Camembert With My Wine Refrigerator

Last weekend, I started a new batch of Camember/Brie.  I decided to increase the batch size so that the finished rounds were thicker than the first time I made it.  Although, they were the correct size last time, I just wanted to have more of that creamy goodness. 


After seven days, I have a healthy colony of mold on my cheese, thanks to the wine refrigerator I bought a couple months ago.  I was able to set the temperature at 55 degrees for the initial aging part.  It also has a compartment at 46 degrees for my Stilton.  That lower temperature compartment will hold my Camembert/Brie for its final aging.


Using the wine refrigerator really helped put this on track.  I struggled the first time I made this cheese because I was trying to manage the temperature using a mini-refrigerator.  It was always too warm or too cold.  It took forever for the cheese to develop the white mold.  As a result, the outside started to dry out a little, and my rind was thicker than I wanted.  According to the recipe, I now have a "full bloom" and can wrap the cheese in a couple days.  This is a full week to ten days earlier than my first attempt.  This will ensure a thinner rind.

Monday, August 29, 2011

Experiment or Mistake: You Decide

Back in June/July, I wanted to make a Stilton style blue cheese.  I had the premeasured packets for both Brie and blue from my local supply guy in the freezer.  So I got everything together, put it all out on the counter, sterilzed everything, and rechecked to make sure I had the right packet for blue cheese.  I used the recipe that came with my first kit, following every instruction to the letter.  It looked good going into the mold and the press.  I was excited!  But this would be a test of my patience.  Blue cheese takes longer to age in order to develop the full sharpness.  By now, I had my new wine refrigerator to control the temperature of the aging steps.  I was ready!

A couple weeks had gone by and no blue penicillin mold was growing on the cheese.  Instead, it was covered in a white mold identical to Camembert/Brie.  By now I had washed the surface several times with a salt solution like you are supposed to for a Stilton, and I was concerned.  So, I rechecked my supplies.  What did I find?  I was down one packet of Camembert/Brie, and had all of my blue cheese LAB/mold cultures.  I had used the mold cultures for Brie but had followed the instructions for Stilton blue cheese. 

I was tempted to toss the mistake at first.  Who knows what the heck I would get and I wasn't sure I wanted to find out.  But something in me decided that it may not be the best cheese, but it would probably be safe to eat.  So I waited.

A couple weeks ago, I cut into one of the rounds to try it.  Here's a picture of it:


The texture is somewhere softer than a Stilton, but not creamy like a Brie, even at room temperature.  The flavor is sharp, but with undertones of a Brie.  As you can see, there are areas inside the cheese with penicillium candidum blooming instead of penicillium roquforti (white instead of blue).  The sharpness is not quite that of a Stilton.  The rind is very thin and almost not noticeable.  Our family really likes it.  My friends say I should name the "new"cheese I came up with.  I think I'll wait and try making it again.  I did take notes when I prepared it, so I should first see if I can replicate it before naming it.  If anyone has a suggestion for the name of my mistake, I'll gladly entertain them.

So you decide.  Was this a mistake or an experiment?  I say, it was a mistake that turned into an experiment.  In either case, it had a happy ending.  And it does prove a point.  As long as your "mistake" isn't from contamination, wait and see what it turns into.  You might be pleasantly surprised.  May all your mistakes have a fortunate outcome!

Sunday, August 28, 2011

Comments from Violet

A reader of my blog, Violet, sent me a comment and a recipe for juustoa.  It was attached to the posting I did on this blog July 11.  I thought I'd reply to her comments as full fledged post.  So if you have not seen her comment, go back and look for it.  It's very informative.

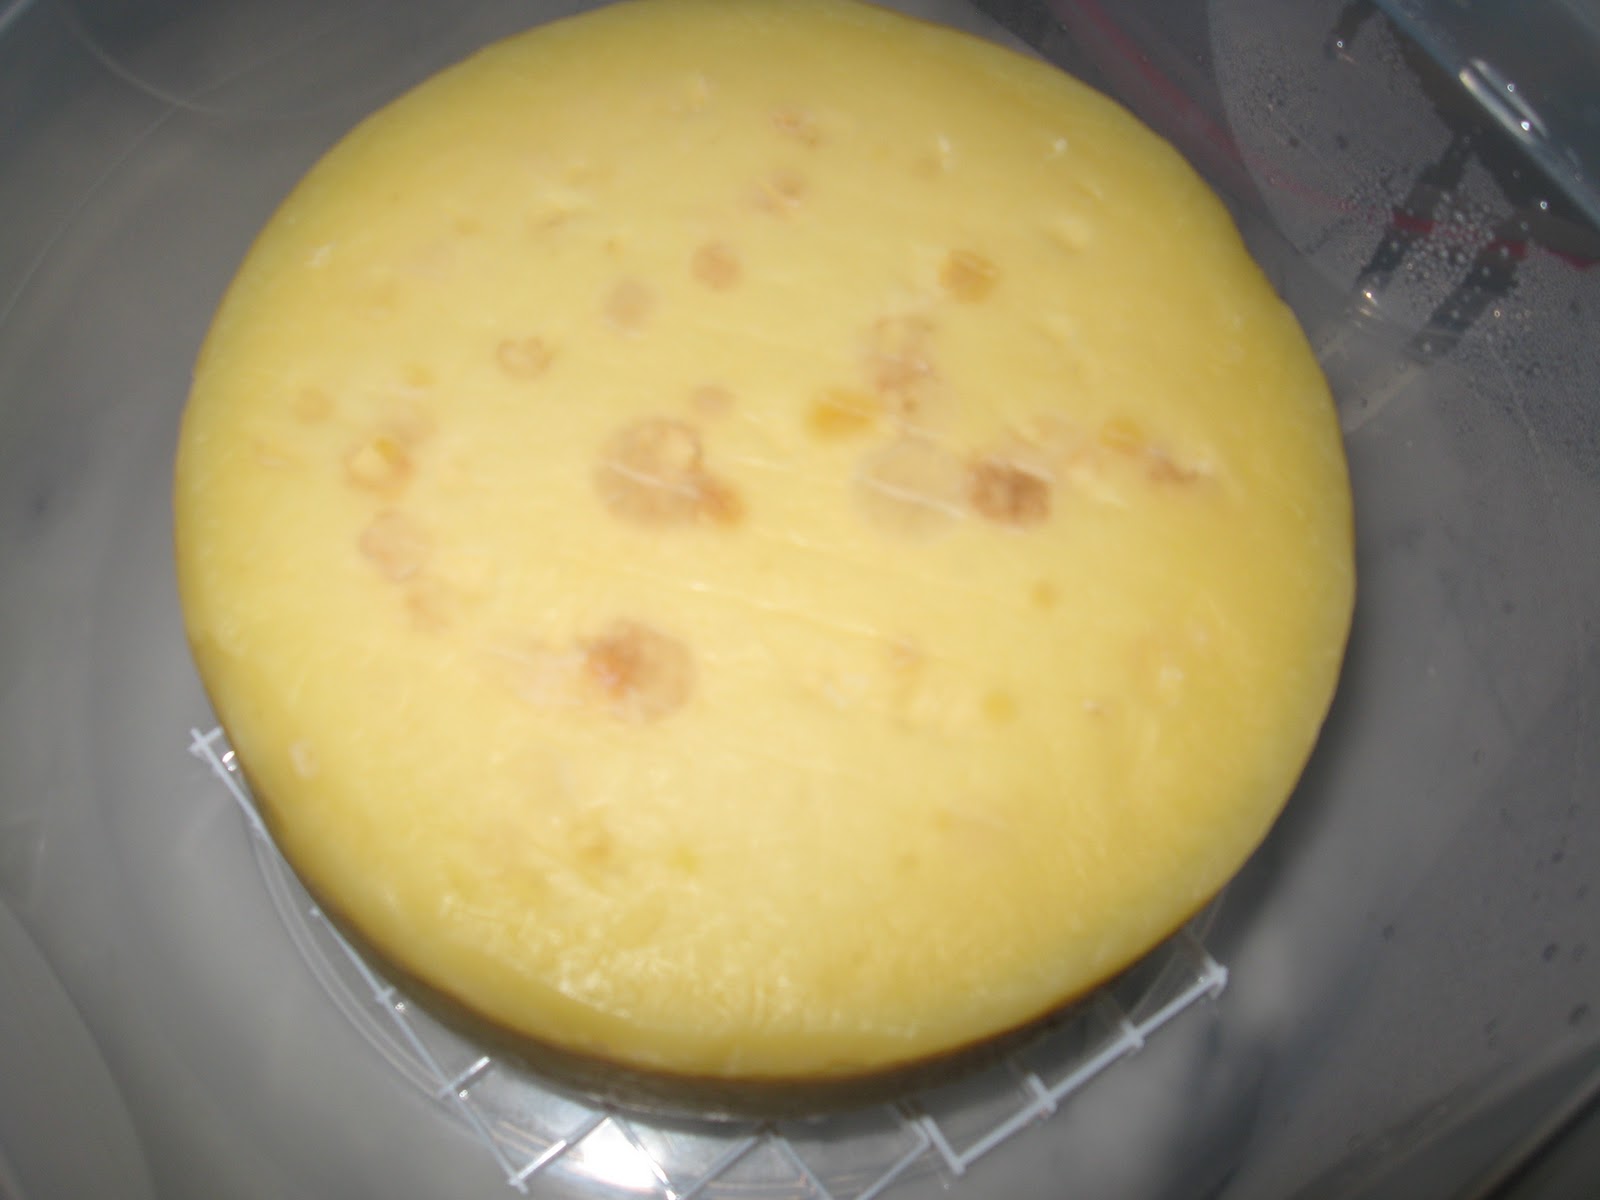
First, thank you Violet!  I appreciate your comments and your kind words.  I shall give your recipe a try to see how it compares to mine.  I'm not afraid to experiment (more on experimenting in my next post).  I have not run into problems with small rice-like curds using pasteurized, but NOT homogenized, milk.  I did run into that from time to time using regular store-bought milk, though. In fact, with the pasteurized only milk,  the curds turn out large and intact as long as I don't over-cut the curds and I let the rennet do it's job by not rushing the process.  I always wait for a clean cut, which I usually have once the curd separates from the wall of the pot, giving a thin layer of whey around the edge.  I also have not had any problem with the curds being fragile.  That's why I drain them in a cheesecloth lined collander.  They stay together well, and more of the whey comes off so I have less to drain during the broiling process.  It's hard to see in the photo of my juustoa, but there are whole larger curds evident in the cut-away.  My juustoa had a good texture to it...not grainy at all.  That's not saying one method is better than another.  Just different approaches to the same end result.  What counts is that they work!

On rennet, as I've said before, I've had mixed results with the tablets of vegetable rennet.  The dry granular calf rennet has always worked for me.  I do have some of the tablets in my cupboard.  I'll give them a go when I make Violet's juustoa recipe.  I say, if it works, don't mess with it.  If you have success with the tablets, then by all means, stick with it!

Violet says she uses unpasteurized milk in her juustoa.  I have yet to use unpasteurized milk for any cheese.  I have my reservations.  However, I would probably try it with juustoa first for the following reasons.  IF any bad bacteria were present, it takes them time to grow in cheese.  Juustoa is a fresh cheese and is not aged, but consumed almost immediately after making.  So the chances of any bad bacteria causing illness is minimal with juustoa.  There just simply isn't enough time for the bacteria to multiply to the point of tainting the cheese....if it were present in the first place.  I am quite content making cheese with pasteurized milk, so long as it isn't homogenized.  The reason I have not tried unpasteurized milk is that I want to be sure I know who I'm getting the fresh milk from, and that I am satisfied with the cleanliness of the dairy operation.  So far, I have not had the time to look for a local farmer.  So, I stick with the non-homogenized organic milk from the co-op that's been pasteurized.

Violet also indicates that she uses a bit more sugar than I do in my recipe.  To that I say, "it is a matter of taste."  When I try making Violet's recipe....and I will be doing that and blogging about it....I will use her complete recipe, except for the unpasteurized milk.  Sorry, Violet, I'm not ready to go there just yet.  I'll probably try her recipe the week after Labor Day weekend.  I just finished putting up another Camembert this weekend and I have to keep an eye on the mold development as well as turn the cheese daily for a while. As much as I'd like to make more cheese, I do have a lot going on these days.  I have to pace myself.

Thanks again, Violet!   As always, everyone's comments are welcome.

Thursday, August 11, 2011

My First Camembert

My wife and I decided to cut into the Camembert I made in late May.  It's been aging since wrapping in late June.  I let it come to room temp before cutting.  Holy Cow!  It oozed perfectly from the white rind and it tasted better than any Camembert or Brie purchased from the store!  Thank goodness I made two.  I did wrap what you see on the plate and put it in the refrigerator.  Otherwise, I would have eaten it all during the evening.  I am definitely making this again, and again, and again!

Monday, August 8, 2011

Update

Still haven't made any cheese lately.  Too many things occupying my time right now.  However, I did check my Camembert that I made in May, and it is getting soft in the middle.  I just gently squeezed the wrapped cheese to check it's progress and it's much softer than it was a couple weeks ago.  I'll be ready to unwrap one in mid September to try it out.

The Stilton blue cheese is looking ugly on the outside...the way it's supposed to look.  The penicillin mold on the rind has started to give way to a mix of brown and white mold and it is shrinking a bit as the rind dries out, even in humid conditions.  I used a heavy duty straw, sterile of course, to core the cheese and it tastes good.  It is developing sharpness.  I like the fact that I used a little extra cream to make it, because the texture is like a Stilton, but a bit "creamier".   I also used sterilized stainless steel skewers to poke holes in it to help develop the blue veining.  I still have to wait for November to wrap it, and then by the Holidays, it should be just about ready to cut open. 

I have to remember to get a cheese corer/sampler in the future.  If I make a cheddar, it will be critical to have one to check it's progress.  Maybe my family will get one for me for a Christmas present?

Monday, July 18, 2011

Waiting...

I've not made any more cheeses recently.  I have a busy schedule coming up and the cheeses require some babysitting early on in their creation.  I just won't have time.  In the mean time, the Stilton cheese is progressing nicely.  The blue penicillin mold has changed to a lighter blue-gray, which is normal.  Eventually, I may see some brown and white mold appear as the rind formation ages.  This week, I'll skewer the cheeses to allow more air into the middle, so the penicillin works it's magic more deeply into the cheese.  After that, it's just waiting for three more months and turning the cheeses twice weekly in the ripening container.  The Camembert I made first should be done sometime in late August.  Once I unwrap one of them and cut it open, I'll post a pic, good or bad, for everyone to see how it turned out.

So no posts for a while, I'm afraid.

Thursday, July 14, 2011

Stilton Cheese Attempt


I attempted making a Stilton blue cheese shortly after I made my first Camembert.  The Camembert had developed it's white rind mold and was maturing in its container.  I was on a roll!  So I set to work making my Stilton.  What makes a Stilton different from a just a blue cheese is that it is wiped with salt water to dry out the rind a bit.  Both are different from a true Roquefort in that the Roquefort is made with sheep's milk....try finding that around your neighborhood!  But I do have a source now for sheep's milk and will attempt a Roquefort someday.

I bought my Camembert/Brie/Blue kit and was all set to use the premeasured packets for the blue cheese.  I even rechecked the packets twice to be sure I was using the right ones.  I followed the directions to the letter.  I molded the cheeses and set them to age.  Then I waited for the blue mold to appear.  And waited, and waited, and waited.  I got white mold.  Well, penicillin does bloom white at first, then blue.  So I waited some more.  Still nothing.  So out of curiosity, I rechecked the inventory of packets in the freezer.  I was down one Camembert/Brie and had all of my blue packets!  So I made Camembert but followed the heating and other methods for blue cheese.  I have no idea what I'm getting, but I will be interested in seeing what it turns out to be :-)

Between the failed blue attempt and a re-do, my daughter convinced me to make cultured butter.  We did and it was excellent.  I even made Buttermilk Kasse from the buttermilk we got from making butter.  It, too, was very tasty.  So now it was time to try making my Stilton again.  This time, I know I used the right packet!

After about seven days, the first little spots of blue appeared.  At 12 days, the blue mold had spread throughout the borders between the curds as you can see in the photo below.  The two photos at the top are of the same cheese.  The first one is a top view at 12 days, and the one below it is the same top view but at 16 days...what a difference!  Still, this is now July and the Stilton won't be ready until November.  This hobby is not for satisfying instant gratification, I can tell you!

Wednesday, July 13, 2011

Finding the Right Steps for Juustoa - Holding the Temperature

In my search for the steps missing in my juustoa recipe, I came across a cheesemaking supply store called The Cheesemaker (website www.thecheesemaker.com).  The owner, Steve Shapson, writes that when he got into cheesemaking, he found that many of the recipes seemed to be missing steps.  So he went in search of clues to help him successfully make cheese at home.  Wow!  That struck a chord.  So I ordered several items including a kit and instructions for making Camembert, Brie, and blue cheeses.  I thought that his recipes may yield some clues for juustoa.  And I kind of wanted to try my hand at Camembert and blue cheese as a lark.  The kit was inexpensive and it came with both instructions and premeasured packets of LAB and mold cultures.  Ideal for a novice!

In reading the recipes for Camembert and blue cheese, I noticed that they said that the milk must be held at temperature for the specified time after the addtion of the lactic acid bacteria (LAB) to allow the bacteria to begin working before the addition of rennet.  Juustoa does not have LAB added to it.  But I remembered that proteins are interesting molecules.  When you change their temperature, they twist, contract, expand, relax.  But it takes time for the protein to reach its natural shape after the temperature changes.  Hmmm.  My first theory was born: Holding the milk to temperature for an hour lets the proteins come to equillibrium.  So that's why I added the step of letting the milk ripen for juustoa.  That, and if it's good enough for other cheeses, why not juustoa?  It seems to work.

The other change in my juustoa recipe came again as a result of reading other cheese recipes.  The juustoa recipes I have all said to remove the milk from the stove after adding the rennet.  This lets the milk cool as the enzyme in rennet coagulates the milk protein.  Almost all of the cheese recipes I have found said to hold the milk at temperature for various times after adding the rennet.  If you think about it, rennet is an enzyme found in the stomachs of calves.  It's purpose is coagulate the cow's milk so the proteins can be more easily separated from the water in the calf's digestive system.  Calves are living creatures and their body temp is warm, so.....yes, holding the milk at a warm temperature probably helps the enzyme work more effectively.  That's theory number two!  And again, it seems to work.